

Contents
A practical guide to browsing, downloading and publishing community content:
- 01 Find community content
- 02 Download mods and other resources
- 03 Download screenshots as JPG images
- 04 Access your dashboard
- 05 Publish items (mods)
- 06 Publish screenshots or a gallery
- 07 Add a YouTube video to a post
- 08 Manage published posts and profile content
- 09 Troubleshooting and good submission practices
01 Find community content
GTA6Modify.com brings community-created mods, add-ons, custom items, tutorials and related resources together with gameplay screenshots and galleries.
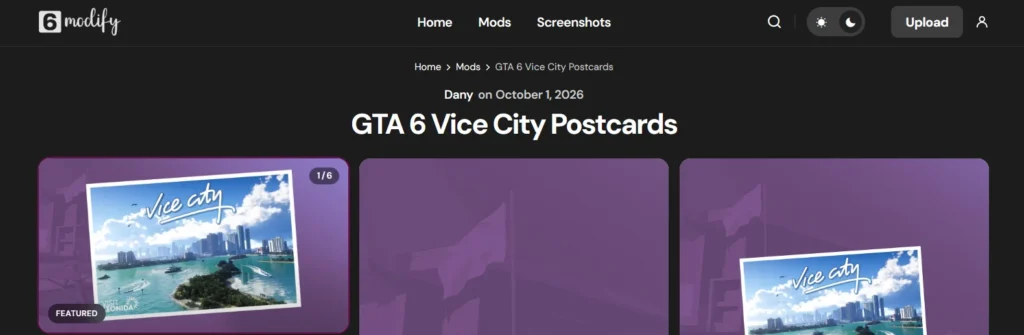
Browse mods and custom content
Choose Mods from the website header menu to explore custom content, mods, add-ons and other item posts. Open a post to read its full description, review its screenshots and find its available downloads.
- Read the description before downloading. Look for installation steps, supported game version, prerequisites, required mods, changelog and credits.
- Check each download option and version label. A post can offer more than one file or version.
- Use the site search and post categories to narrow your results.

Browse screenshots and galleries
Choose Screenshots in the header menu to browse image posts, gameplay captures and community galleries. Open a post to view its description and images. Select an image to view the available image actions, including the download button when present.
Other useful site controls
- Use the site search to find posts and pages, and use categories to explore related content.
- Use the theme control to switch between light/day and dark appearance when available.
- Use the share controls or copy the page link to share a post with others.
- Open a creator profile and use Follow or Unfollow to manage the authors you follow. Posts from followed authors can appear in your dashboard feed.
02 Download mods and other resources
Download links and files are supplied by the post author. Some resources may be hosted on an external file-sharing service rather than on GTA6Modify.com.
- Open Mods from the header and choose the item you want.
- Read the complete description. Confirm the supported game version, dependencies, installation method and any warnings before downloading.
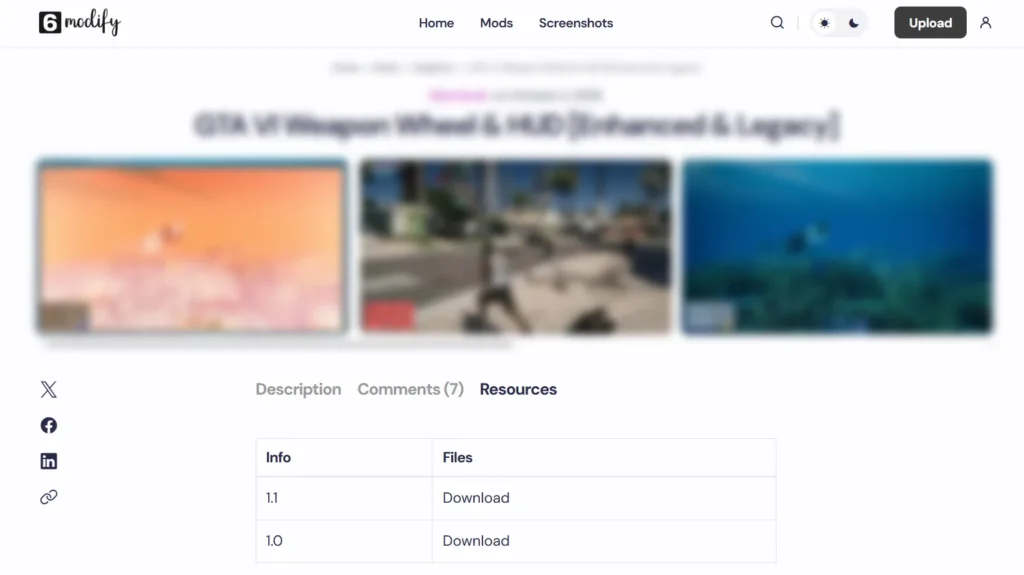
- Open the post’s Resources tab and choose the file or version that matches your game and setup.
- Click that resource’s download link. It will open a download page.
- On the download page, click the large Download button and wait approximately 10–15 seconds. Depending on the author’s link, the file may start downloading or the page may redirect you to the external file-hosting website.
- If you are redirected, follow the file host’s download steps and check that you are downloading the intended file. Your browser will normally save it to its Downloads folder unless you have changed that setting.
Protect your game and device Back up your game files before installing a mod. Scan downloaded files with a reputable, up-to-date antivirus/security tool and only use files from sources you trust. Do not disable security protection just to run a suspicious file. Follow the author’s installation and removal instructions.
If a download does not work
- Check whether the download page is still waiting for its timer or whether a new tab has opened.
- Allow pop-ups only when you trust the destination and understand why the browser blocked it.
- Try another download option in the same post, if available, or contact the author/report the link if it is broken.
- GTA6Modify.com does not control external file hosts and cannot guarantee that author-provided files or external links are safe, current or available.
03 Download screenshots as JPG images
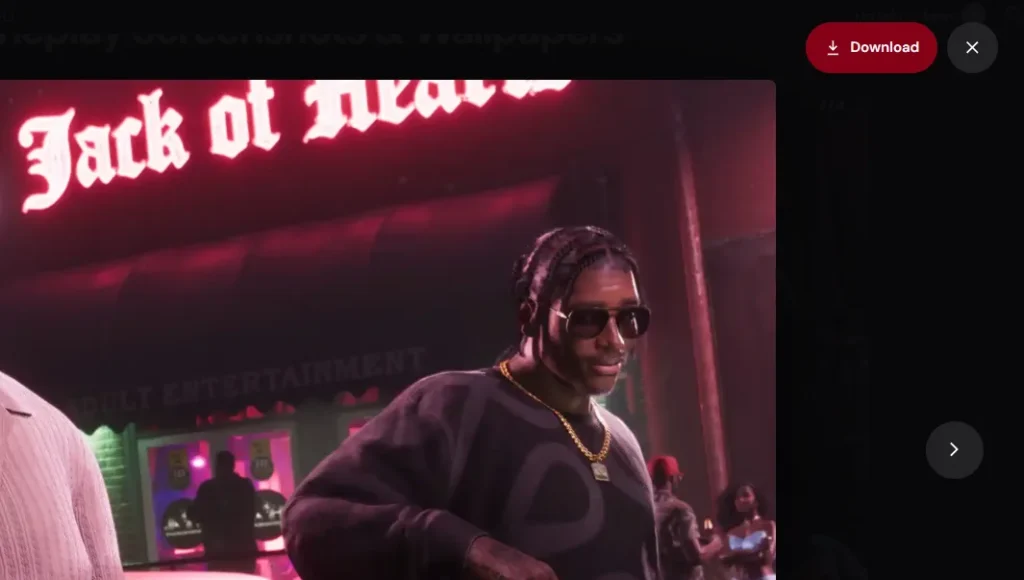
Screenshot posts have an image download action for saving an image in JPG format.
- 1. Open Screenshots in the header menu.
- 2. Choose the gallery or screenshot post you want to view.
- 3. Click the image you want to save.
- 4. Click the Download button. The image will download in JPG format.
Downloaded images may reflect the site’s processed/compressed version rather than the creator’s original source file. Respect the author’s stated permissions and give credit when required. Do not assume that a public screenshot may be reused for any purpose.
04 Access your dashboard
Signing in before you submit content is the best way to keep your posts associated with your account.
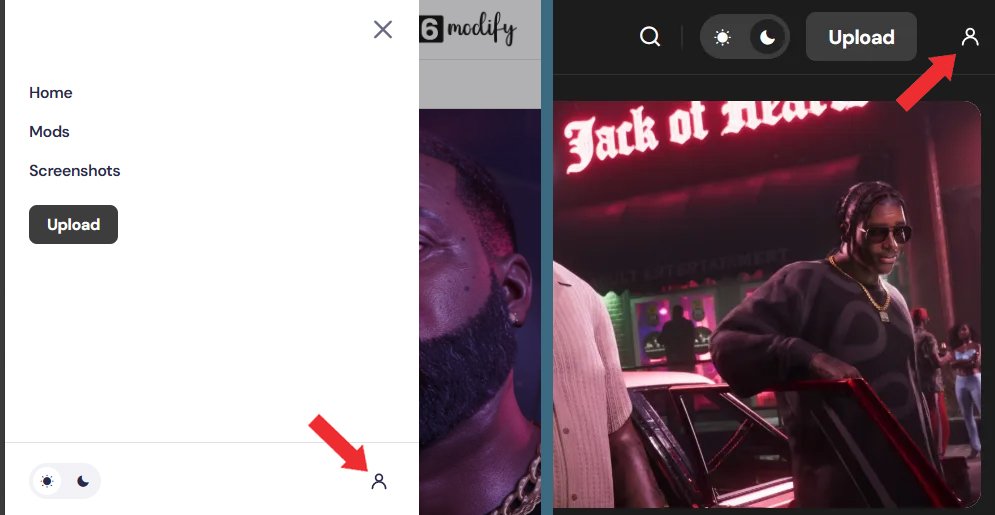
- Desktop: click the profile icon in the website header.
- Phones and tablets: click the profile icon in the sidebar/navigation area.
- Direct address: the shortcut supplied for the site is https://gta6modify.com/dashbaord. If it does not open, use the profile icon instead; the direct route should be confirmed by the site administrator.
Sign in using one of the methods shown on the site, such as email or other services like Google, Microsoft, or another services if available in your region.
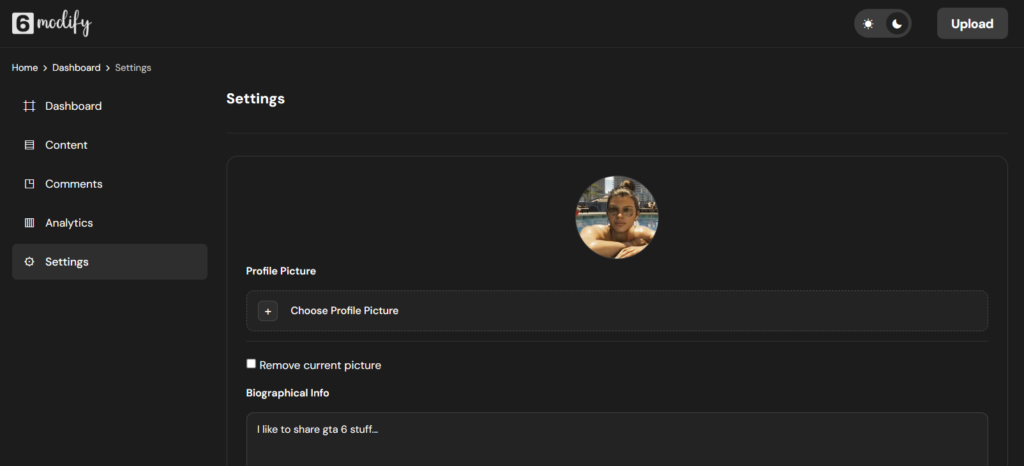
From the dashboard, use the available profile and account settings to manage your name, display name, email, password and profile picture, and review your published content and post analytics. Available options can depend on your sign-in method and the features enabled on the site.
If you register with an email address and receive a password-setup email, follow the instructions promptly, keep access to that inbox and confirm that your sign-in method works before you sign out.
Sign in before submitting You may be able to submit without signing in, but guest submissions may be attributed to a Guest Author and may not appear in your account dashboard. Sign in first if you want your work linked to your profile.
05 Publish items
Open the upload page at https://gta6modify.com/upload and use the Item Submission form. Sign in before starting if you want the submission connected to your account.
Step 1 — Item details

- File name/title: enter a short, clear title that tells visitors what the submission is.
- Description: explain what the content does and include installation steps, changelog, supported game version, required mods/dependencies, source links, important attachments and credits. State known limitations or compatibility notes.
- Screenshots: attach screenshots that clearly show the item in use. Three or more screenshots are recommended for a strong submission; the form allows a maximum of 10 images.
- Click Next.
Step 2 — Category and content limits

- Choose the most relevant category, then select a related topic if the form asks for one.
- Public: use this for normal submissions that should appear in the site’s public browsing and search.
- Adult 18+: use only for permitted mature themes. This content is shown only to signed-in users who enabled the adult-content option in dashboard settings. Explicit sexual/adult content is not permitted; follow all content rules.
- Personal: use this for personal projects intended to be reachable through their direct link rather than publicly listed. A direct link is not private storage, so do not place sensitive information here.
- Click Next.
Step 3 — Version and download
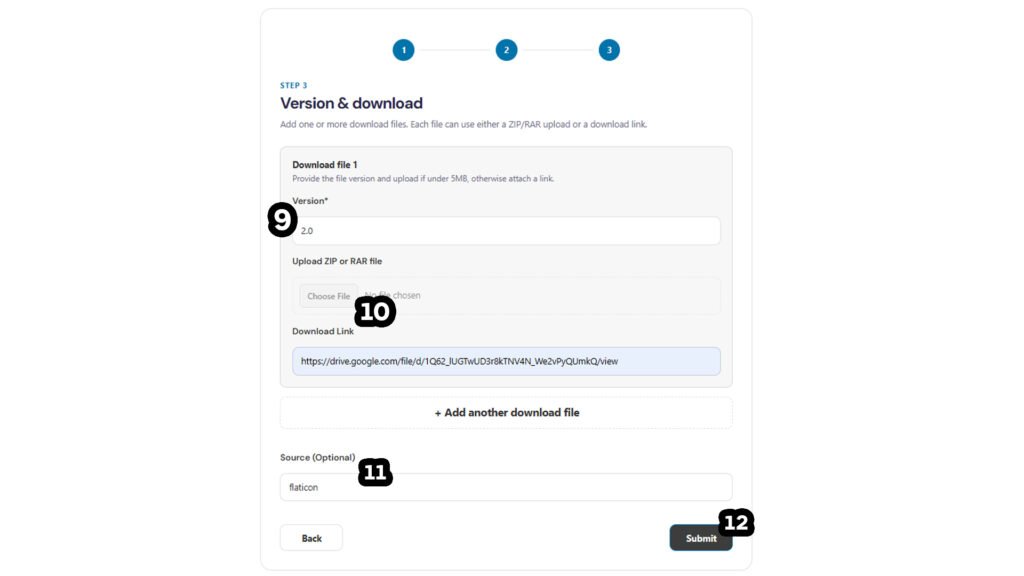
- In Download file 1, enter the version number or release label for the file.
- For a file of 5 MB or less, use the direct upload field with a supported ZIP/RAR archive that is not password-protected or locked. Follow any compression and format restrictions shown by the form.
- For files larger than 5 MB, upload the file to a service such as Google Drive, Dropbox, MediaFire or a comparable file host. Set the share permissions so the intended audience can access it, then paste the share link into the Download Link field.
- To offer multiple versions or alternative files, click Add another download file. You can configure up to 10 download options.
- A source-page link is optional. Include it when useful for credit, provenance or additional instructions.
- Check every title, version, link and instruction, then click Submit.
Review time Allow approximately 24 hours to 7 days for review. This is an expected window, not a guarantee; complex submissions, missing information or high review volume may take longer. Do not repeatedly resubmit the same item while it is waiting for review.
06 Publish screenshots or a gallery
Use the Screenshots form on the upload page to submit gameplay images, a story-driven gallery or other permitted community images.
Step 1 — Screenshot details

- Title: give the gallery a clear, descriptive title.
- Description: explain what the images show, the setting or story behind them, and any relevant context. A description may be optional, but it is recommended.
- Images: attach the screenshots you want to publish. Two or more images are recommended; the form permits up to 100 images in a single post.
- Click Next.
Step 2 — Category, credits and content limits

- Choose the category that best fits your gallery so readers can find it.
- Credit yourself and anyone else who contributed to the screenshots, edits, presets or project, where applicable.
- Choose Public for normal galleries, Adult 18+ only for permitted mature themes, or Personal for a project intended to be reachable by direct link rather than publicly listed. Explicit sexual/adult content is not permitted.
- Review the images, title, category, credits and visibility setting, then click Submit.
Review time Allow approximately 24 hours to 7 days for the gallery to be reviewed. Keep a local copy of your image files until the submission is available on the site.
07 Add a YouTube video to a post
The site can automatically embed a YouTube video link included in a post description.
- Copy the URL of the YouTube video you want to share.
- Paste the URL into the description field in either the item or screenshot submission form. Add it where it makes sense within the description.
- Complete the rest of the form and submit it. When supported by the post, the URL will be automatically embedded for playback.
Only share videos you are allowed to link to and that comply with the site’s content rules. Do not upload or link to material that infringes copyright, exposes private information or violates platform rules.

Attached videos on existing posts
If you use the separate attached-video feature, a video may be published instantly. The post author or a site administrator can remove an attached video. After removal, the submitting user may not be able to attach that video again unless the author or administrator adds it back at the user’s request.
08 Manage published posts and profile content
The available actions depend on the feature and permissions enabled for your account.
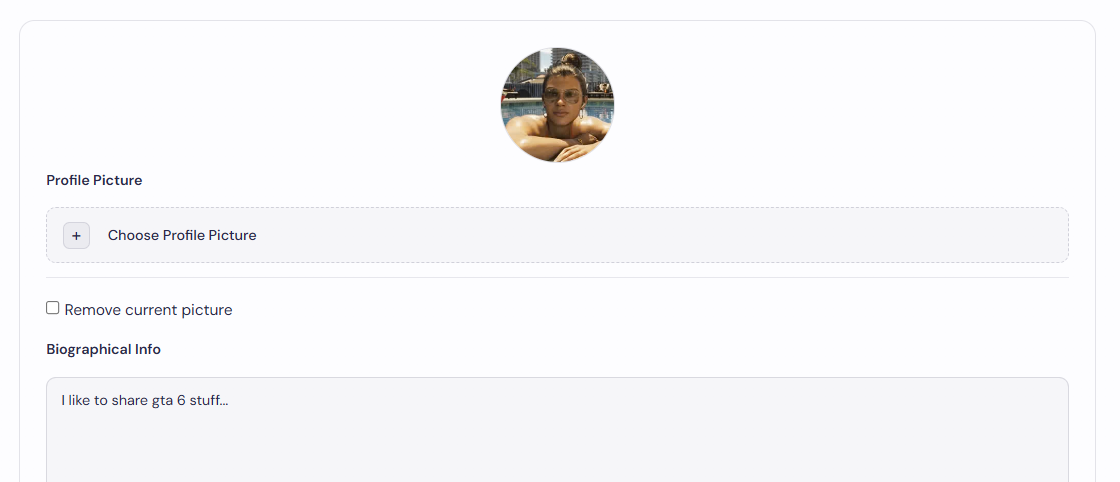
- Profile picture: use your account settings to set or remove your profile picture.
- Published posts: the site may offer a delist option. Delisting hides a post from normal site listings, but the post may remain reachable through its original URL. Delisting is not the same as permanent deletion.
- Comments: a published comment may not be directly deletable by the commenter under the current site behavior. The author or administrator of the post may be able to remove comments on that post.
- Images: submitted images may be automatically compressed before publication by the site. Keep your own originals if you need them.
- Attached videos: the post author or administrator can remove an attached video as described above.
Think before publishing Do not post passwords, personal documents, private messages or any content you would not want accessible by link. Because delisting may not permanently remove content, contact the site team for privacy or legal requests rather than assuming that delisting erases every copy.
09 Troubleshooting and good submission practices
These checks can help prevent common download and publishing problems.
Before you submit
- Confirm that you own the content or have permission to share it. Credit original authors and sources.
- Confirm that your mod, assets, screenshots and descriptions comply with applicable game-publisher policies and the site’s Community and Modding Guidelines. Publishing on this site does not mean Rockstar Games or Take-Two Interactive has approved a mod.
- Test external download links and make sure the intended file or folder is accessible to visitors.
- Include the game version, installation instructions, dependencies and limitations to reduce compatibility questions.
- Use a descriptive title, relevant category and clear screenshots. Avoid misleading labels or claims.
External creator links and support
- Authors may include relevant source pages, store pages, premium versions of their own releases or creator-support links where permitted by the site rules.
- Donation links such as Patreon, PayPal or other payment services are provided by the author. Read the terms of the destination service and confirm who receives the payment before proceeding.
- GTA6Modify.com does not itself sell items through these links or guarantee third-party products, services or transactions. Do not describe third-party products as officially endorsed by Rockstar Games or Take-Two Interactive unless you have valid authorization.
If your post is delayed or rejected
- Check the post and account/dashboard areas for available status or feedback.
- If information is missing, update the submission using the available controls or follow the site’s instructions for contacting moderation.
- Do not submit the same item repeatedly to try to bypass review.
- If a download is incompatible, report the game version and issue clearly to the author. If a link is broken, tell the author which download option failed.
Last Updated: 10 October 2026